opencv教程-基于learning opencv3
转载请私信.
- vs2015配置opencv3开发环境
官网地址:OpenCV library
- 下载完成后双击安装,并配置环境变量
- 打开VS2015,新建项目
- 配置opencv
添加包含目录
添加库目录
添加附加依赖项 将vc14下的lib都添加进来,以d结尾的lib文件为调试使用
- 测试
#include <iostream>
#include <opencv2/core/core.hpp>
#include <opencv2/highgui/highgui.hpp>

using namespace cv;
int main() {
	Mat img = imread("D:/learn/dota.jpg");
	imshow("dota", img);
	waitKey(6000);
}
运行
结果
2.opencv模块简介
- calib3d
相机校准和3维重建相关的内容,包括多视角几何算法、单个立体摄像头标定、物体姿态估计、立体相似性算法等
- core
核心功能模块,包含opencv基本数据结构、动态数据结构、绘图函数、数组操作、辅助函数/系统函数/宏、OpenGL互操作
- imgproc
图像处理模块,包含线性和非线性的图像滤波、图像几何变换、直方图、结构分和形状描述、运动分析、运动分析和对象跟踪、特征检测、目标检测
- features2d
2D功能模块,包含特征检测和描述、特征检测器通用接口、描述符提取器、描述符匹配器、通用描述符匹配器接口、关键点绘制函数和匹配功能绘制函数
- flann
高维近似近邻快速搜索算法库,包含快速近似最近邻搜索、聚类
- gpu
运用GPU加速计算机视觉模块
- highgui
高层GUI图形用户界面,包含媒体输入输出、视频捕捉、图像和视频编码解码、图形交互界面接口
- legacy
废弃的代码库,用于向下兼容
- ml
机器学习模块,包含统计模型、贝叶斯分类器、支持向量机、决策树、提升、随机树、神经网络
- objdetect
目标检测模块,包含级联分类和LatentSVM
- photo
图像修复和去噪
- stitching
图像拼接模块,包含拼接流水线、特点寻找和匹配图像、估计旋转、自动校准、图片歪斜、接缝估测、曝光补偿、图片混合
- superres
超分辨率技术模块
- video
视频分析组件,包含运动估计、背景分离、对象跟踪
- videostab
视频稳定组件
3.图像载入、显示、输出
- 载入函数
Mat imread( const String& filename, int flags = IMREAD_COLOR );
IMREAD_UNCHANGED   = -1, //!< If set, return the loaded image as is (with alpha channel, otherwise it gets cropped).
IMREAD_GRAYSCALE   = 0,  //!< If set, always convert image to the single channel grayscale image.
IMREAD_COLOR       = 1,  //!< If set, always convert image to the 3 channel BGR color image.
IMREAD_ANYDEPTH    = 2,  //!< If set, return 16-bit/32-bit image when the input has the corresponding depth, otherwise convert it to 8-bit.
IMREAD_ANYCOLOR    = 4,  //!< If set, the image is read in any possible color format.

Mat img = imread("D:/learn/dota.jpg");
- 显示函数
imshow("dota", img);
- 输出函数
bool imwrite( const String& filename, InputArray img,
              const std::vector<int>& params = std::vector<int>());
imwrite("D:/new_dota.jpg", img);
- 实例
#include <iostream>
#include <opencv2/core/core.hpp>
#include <opencv2/highgui/highgui.hpp>

using namespace cv;
int main() {
	//图像显示
	Mat logo = imread("D:/learn/logo.jpg");
	imshow("logo", logo);
	//图像混合
	Mat img = imread("D:/learn/dota.jpg");
	imshow("img", img);
	Mat imgROI;
	imgROI = img(Rect(800, 350, logo.cols, logo.rows));
	//logo加载到背景图
	addWeighted(imgROI,0.5,logo,0.3,0,imgROI);
	imshow("dota_logo", img);
	//保存混合的图像
	imwrite("D:/learn/dota_logo.jpg",img);
	waitKey(0);
}
- 读取视频文件 调用摄像头 写入视频文件
#include <iostream>
#include <opencv2/opencv.hpp>
using namespace std;
using namespace cv;
int main() {

	namedWindow("cap", cv::WINDOW_AUTOSIZE);
	VideoCapture cap;
	Mat frame;
	cap.open(0);
	//视频流写出
	Size size = Size(cap.get(CV_CAP_PROP_FRAME_WIDTH), cap.get(CV_CAP_PROP_FRAME_HEIGHT));
	VideoWriter writer;
	writer.open("test.avi", -1, 10, size);
	//

	for (;;){
		cap >> frame;
		imshow("out", frame);
		writer << frame;
		if (waitKey(33) >= 0) break;
	}
	cap.release();
	//waitKey(0);
	return 0;
}
5.opencv数据类型
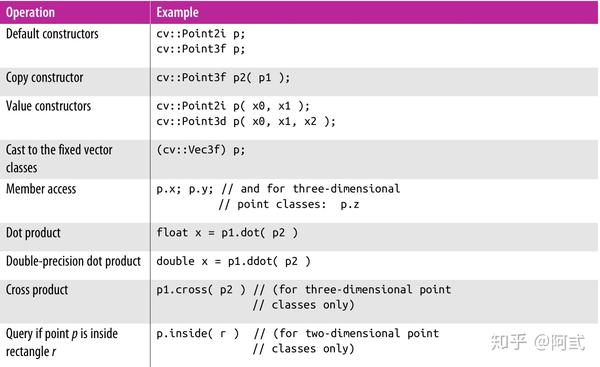
- point
4.Mat类
- 构造矩阵
Mat(int rows, int cols, int type);
Mat(Size size, int type);
Mat(int rows, int cols, int type, const Scalar& s);
Mat(Size size, int type, const Scalar& s);
Mat(int ndims, const int* sizes, int type);
Mat(int ndims, const int* sizes, int type, const Scalar& s);
Mat(const Mat& m);
Mat(const Mat& m, const Rect& roi);
Mat(const Mat& m, const Range* ranges);
构造函数方法
Mat(int rows, int cols, int type, const Scalar& s);
Mat matrix(2, 2, CV_8UC3, Scalar(0, 0, 255));
Mat matrix(2, 2, CV_8UC2, Scalar(1,2));
int rows, int cols:二维矩阵的行列数 ->图像分辨率
int type:存储元素的数据类型和通道数 CV_[位数][是否带符号][类型前缀]C[通道数]
const Scalar& s:矩阵每个元素以s向量(颜色)填充 向量维度由通道数决定
matrix = [  0,   0, 255,   0,   0, 255;
            0,   0, 255,   0,   0, 255]
matrix = [  1,   2,   1,   2;
            1,   2,   1,   2]
方法构造
Mat matrix = Mat::eye(4, 4, CV_64F);
Mat matrix = Mat::ones(4, 4, CV_32F);
Mat matrix = Mat::zeros(3, 3, CV_8SC1);
[1, 0, 0, 0;
 0, 1, 0, 0;
 0, 0, 1, 0;
 0, 0, 0, 1]
[1, 1, 1, 1;
 1, 1, 1, 1;
 1, 1, 1, 1;
 1, 1, 1, 1]
[  0,   0,   0;
   0,   0,   0;
   0,   0,   0]
手动构造
Mat matrix = (Mat_<double>(3, 3) << 1, 2, 3, 4, 5, 6, 7, 8, 9);
[1, 2, 3;
 4, 5, 6;
 7, 8, 9]
- 输出Mat
Mat matrix(2,2, CV_8UC3, Scalar(0,0,255));
默认风格
std::cout << matrix << std::endl;
[  0,   0, 255,   0,   0, 255;
   0,   0, 255,   0,   0, 255]
Python风格
std::cout << format(matrix,Formatter::FMT_PYTHON) << std::endl;
[[[  0,   0, 255],
  [  0,   0, 255]],
 [[  0,   0, 255],
  [  0,   0, 255]]]
Numpy风格
std::cout << format(matrix, Formatter::FMT_NUMPY) << std::endl;
array([[[  0,   0, 255], [  0,   0, 255], [  0,   0, 255]],
       [[  0,   0, 255], [  0,   0, 255], [  0,   0, 255]],
       [[  0,   0, 255], [  0,   0, 255], [  0,   0, 255]]], dtype=uint8)
5.Scalar类 颜色表示
Scalar(a, b, c) :a->蓝色分量 b->绿色分量 c->红色分量
Scalar(0, 0, 255) ->红色像素点
6.Rect类 矩形表示
Rect(x,y,width,height) : x,y -> 左上角坐标点 width,height ->矩形的宽高
7.cvtColor() 颜色空间转换
3通道彩色图转换为1通道灰度图
Mat image = imread("D:/learn/logo.jpg"),new_image;
cvtColor(image, new_image,CV_BGR2GRAY);
imshow("new_image", new_image);
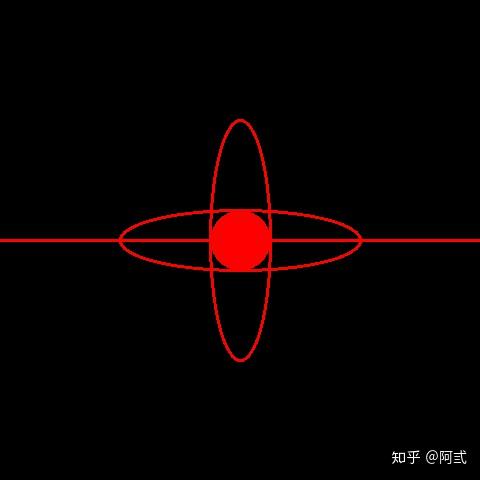
8.基本图形绘制
#include <iostream>
#include <opencv2/opencv.hpp>
#include <opencv2/highgui/highgui.hpp>
using namespace cv;
#define WINDOW_SIZE 480

//绘制直线
void drawLine(Mat img, Point start,Point end) {
	int thickness = 2;
	int lineType = 8;
	line(img,
		start,//起点坐标
		end,//结束坐标
		Scalar(0, 0, 255),//颜色
		thickness, //线宽
		lineType);//线型
}
//绘制圆
void drawCircle(Mat img, Point center) {
	int thickness = -1;
	int lineType = 8;
	circle(img,
		center,//中心点
		WINDOW_SIZE / 16,//半径
		Scalar(0, 0, 255),//颜色
		thickness, //线宽
		lineType);//线型
}
//绘制椭圆
void drawEllipse(Mat img, double angle) {
	int thickness = 2;
	int lineType = 8;
	ellipse(img,
		Point(WINDOW_SIZE / 2, WINDOW_SIZE / 2),//椭圆中心点
		Size(WINDOW_SIZE / 4, WINDOW_SIZE / 16),//椭圆大小
		angle,//椭圆旋转角度
		0, 360, //扩展弧度范围
		Scalar(0, 0, 255),//颜色
		thickness, //线宽
		lineType);//线型
}
int main() {
	//空白Mat图像
	Mat image = Mat::zeros(WINDOW_SIZE, WINDOW_SIZE, CV_8UC3);
	//绘制椭圆
	drawEllipse(image, 0);
	drawEllipse(image, 90);
	//绘制圆
	drawCircle(image,Point(WINDOW_SIZE/2,WINDOW_SIZE/2));
	//绘制直线
	drawLine(image, Point(0, 240), Point(480, 240));
	imshow("DRAW",image);
	waitKey(0);
	getchar();
	return 0;
}
9.感兴趣区域ROI
Mat bg = imread("D:/learn/bg.jpg");
Mat logo = imread("D:/learn/logo.jpg");
Mat mask = imread("D:/learn/logo.jpg",0); //掩模
Mat ROI = bg(Rect(100,100,logo.cols,logo.rows));//感兴趣区域
logo.copyTo(ROI,mask);//复制logo图像到感兴趣区域
imshow("ROI", bg);
10.线性混合操作
- addWeighted()函数 计算图像矩阵的加权和
void addWeighted(InputArray src1, double alpha,
                 InputArray src2,double beta, double gamma,
                 OutputArray dst, int dtype = -1);
dst = src1[i]alpha + src2[i]*beta+gamma
src1和src2尺寸大小一致
Mat bg = imread("D:/learn/bg.jpg");
Mat logo = imread("D:/learn/logo.jpg");
Mat dst;
imshow("bg", bg);
addWeighted(bg,0.5,logo,0.5,0.0,dst);
imshow("dst", dst);
#图像尺寸大小不一致时
Mat bg = imread("D:/learn/bg.jpg");
Mat logo = imread("D:/learn/logo.jpg"););
Mat dst;
Mat ROI = bg(Rect(1100,350,logo.cols,logo.rows));
addWeighted(ROI,0.5,logo,0.5,0.0, dst);
imshow("ROI", dst);
11.通道分离,多通道图像混合
- 通道分离 split()函数


